Wood Engraving Tools Burning is a process that can be used to create beautiful and intricate designs in wood. The process is simple, but it does require some patience and practice to perfect. With the right tools and a little bit of creativity, anyone can create stunning woodburned pieces.
Wood engraving tools burning is a process where the artist uses a hot poker to burn lines into wood. This can be done freehand or with the help of a stencil. The lines will be burned into the wood and will remain there even after the piece is sanded or carved.
This type of art is perfect for creating unique signs, logos, or other artwork.
Wood Burning Pen
Whether you’re a professional artist or a hobbyist, chances are you’ve considered investing in a wood burning pen. Also known as pyrography pens, these tools allow you to create beautiful works of art by burning designs into wood.
If you’re new to the world of wood burning, the process may seem daunting.
But with the right tools and some practice, anyone can create stunning pieces of art. In this post, we’ll walk you through everything you need to know about wood burning pens, from how they work to where you can buy them.
Wood Burning Pens: The Basics
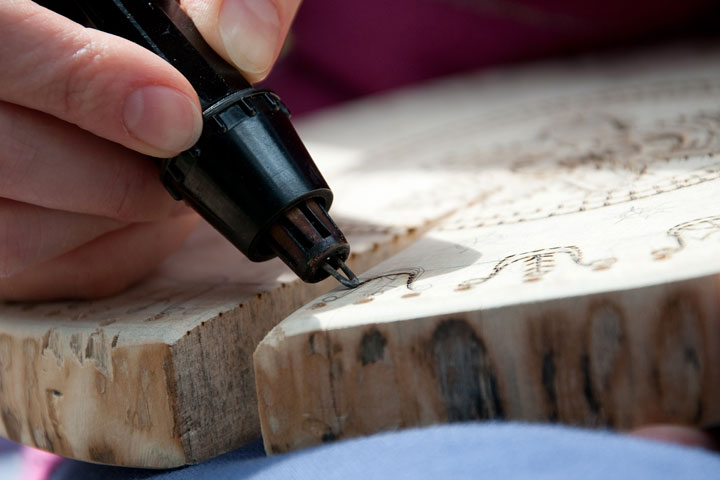
A wood burning pen is essentially a handheld device that uses heat to burn designs into wood. Most pens have adjustable temperature settings that allow you to control how hot the tip gets. This is important because different woods require different temperatures to Burn evenly without scorching.
In terms of design, most wood burning pens feature a metal tip that comes to a point or V-shape. This allows you to create both fine lines and broader strokes depending on your needs. Some pens also come with interchangeable tips so you can experiment with different effects.
Credit: www.power-carving.com
What is the Wood-Burning Tool Called?
A wood-burning tool is also known as a pyrography pen and is used to create designs, patterns or pictures on wood by burning a design into the surface of the wood. The tip of the pen gets very hot, so it’s important to be careful when using one.
How Do You Engrave a Wood-Burning Tool?
Engraving a wood-burning tool is a simple process that can be done at home with a few supplies. The most important thing you’ll need is a wood-burning pen, which can be purchased at most craft stores. Once you have your pen, gather your other supplies, including a piece of sandpaper, some tracing paper and carbon paper, and an engraving bit.
Start by sanding the area where you’ll be engraving to create a smooth surface. Then, use the tracing paper and carbon paper to transfer your design onto the wood. When you’re ready to start engraving, use the engraving bit on your wood-burning pen to slowly trace over your design.
Be sure to go slowly and evenly to avoid making any mistakes.
With a little practice, engraving designs into wood can be easy and fun! Just remember to take your time and work carefully for best results.
Does Dremel Do Wood Burning?
Dremel is a popular brand of rotary tool that can be used for a variety of tasks, including wood burning. While Dremel tools are not specifically designed for wood burning, they can be used for this purpose with the right attachments and tips.
Wood burning with a Dremel tool is similar to using a pen or pencil to draw on wood.
The main difference is that the Dremel tool spins rapidly, allowing you to create intricate designs and patterns.
To get started, you will need a few supplies including:
-A Dremel rotary tool with variable speed control
-A wood burning attachment or tip (available at most hardware stores)
-A piece of sandpaper (optional)
Before you begin, it’s important to practice on scrap pieces of wood so you can get a feel for how the tool works.
When you’re ready to start your project, make sure the area you’re working in is well ventilated and free from any flammable materials.
Begin by choosing the design you want to burn into the wood. If you’re using a stencil, place it onto your work surface and secure it in place.
If you’re drawing freehand, simply sketch your design onto the wood with a pencil.
Now it’s time to start burning! Select a low speed on your Dremel tool to start out with -you can always go faster if needed but it’s difficult to slow down once you’ve gotten going.
Gently guide the tip of your chosen attachment along your lines, applying even pressure as you go. As you work, the heat from thetool will cause the wood fibers to darken and curl up – this is normal! Just keep moving slowly and steadily until your design is complete.
Once you’re finished, allow the wood to cool completely before handling.
What is the Difference between Wood Burning And Pyrography?
Wood burning is a process of using heat to transfer a design onto wood. It involves a tool that gets hot and then is pressed against the wood. The heat from the tool causes the wood to darken in color and change shape.
Pyrography is similar to wood burning, but it uses a pen-like tool that allows for more detailed designs.
Wood burning for beginners (pyrography) – how to get started
Conclusion
Wood engraving is a form of relief printing and is usually done with a hand-held tool. The wood is first prepared by coating it with a layer of ink or paint, which is then transferred to the paper. A variety of tools can be used for wood engraving, including knives, chisels, and gouges.
Burning is one of the most common techniques used to create designs in wood. A hot poker or other sharp object is used to burn lines into the surface of the wood. This technique can be used to create both simple and complex designs.